
If you are reading this before purchasing the laptop, get it with one of the intel wireless options and not with the “ThinkPad b/g/n” one. Intel wireless drivers has been merged into the mainline kernel since 2.6.24, so you should have no headaches at all with getting it to work.
Some Interesting stuff I noted during the process I am about to describe:
Regarding boot times:
Windows 7 boot time to login prompt: ~32 seconds
Arch boot time (with gnome 3 and fully configured system): ~12 seconds
Regarding Installation size:
Windows 7 installation with factory default settings size: ~30 GB and 1.17 GB for a separate boot partition
Arch installation size after all configurations and programs installed: 6.87GB
Stuff like this makes me wonder why people still use windows as their primary OS….
Today I received my new laptop (a ThinkPad t420s, i5 processor, 128gb SSD, 4GB RAM), and whats the first thing to do?
Open it, turn it on, make recovery disks and format Win7 to make way to the almighty Archlinux.
I’m going to post here the entire process to make this system a Linux beast, Lenovo is popular for Linux systems for a reason.
1) Like said above, make recovery media for the original Win7 for when you want to sell the laptop to a Windows user in the future, after you go trough the setup process the system will ask you to create the media. Do it and move on.
2) Burn a cd of the most recent archlinux installation media.
3) Insert the cd, select the option “boot archlinux” and then type /arch/setup to begin the installation process. At this point I would recommend having a copy of the Archlinux beginners guide opened in another tab of your browser.
4) When you get to partition the hard drive, the easiest and most automated way is to use auto-prepare (option 1), if you want more control on the partitioning process, choose option 2.
WARNING: choosing option 1 will erase your entire hard drive, if you want to keep your Windows 7 installation and configure dual boot later, DONT SELECT THIS.
5) Regarding filesystem types, lost of people just tend to choose ext4 for home and root partitions because they don’t know the other types, please make an informed decision about this by reading this short explanation on filesystems. I was going to choose XFS for my home and root partitions, but taking into account XFS partitions cannot be shrunk (read online resizing section) and this is a small SSD hard drive in which I may have to resize partitions, I choose ext4 on both.
6) When you get to select the packages you want to install, along with the default ones I selected ca-certificates, dnsutils, iptables, libsub, linux-docs, linux-firmware, linux-headers, lzo2, mkinitcpio, ncurses, openssh, openssl, openvpn, pacman-mirrorlist, sudo and tzdata. Don’t deselect packages at this stage unless you know what you are doing.
7) Wait for the package installation to finish, and then verify the configuration files presented on the next page, here I usually just change my hostname and set my eth0interface to dhcp on rc.conf, uncomment additional locales on locale.gen, uncomment some mirrors from pacman mirrorlist and change root password.
8) Now reboot into your new Archlinux system and login as root!
9) The first thing you need to do now is to update the pacman package database and upgrade the currently installed files to their latest versions, do that with:
#pacman -Syyu
If you get a message that pacman has to be updated first, do it and then just issue the same command again.
10) One pretty good trick you can do to speed up pacman is to use a little nifty script called reflector. I like to install and use this after the system has been completely updated to avoid problems. Reflector can get the latest mirrorlist from the MirrorStatus page, filter the most up-to-date mirrors, sort them by speed and overwrite the file /etc/pacman.d/mirrorlist.
This will give you a system with very good mirrors and fast downloads.
To install:
#pacman -S reflector
First it is recommended to backup your mirrorlist (DO IT):
# mv /etc/pacman.d/mirrorlist /etc/pacman.d/mirrorlist.backup
The following command will filter the first 5 mirrors, sort them by speed and overwrite the file /etc/pacman.d/mirrorlist
# reflector -l 5 --sort rate --save /etc/pacman.d/mirrorlist
For all available commands run
# reflector --help
Warning: Make sure the mirrorlist doesn’t contain strange entries before syncing or updating with pacman.
11) For the sound part, I had to use alsaconf to make the system set the intel sound card as default, to do this just type:
alsaconf
12) Next I installed everything else, I choose Gnome3 as my Desktop environment, and then I followed by installing all the apps I use (Libreoffice, gimp, clementine, etc.). As a rule of thumb, I have the archwiki open and check big and important package installation instructions to avoid future headaches, for example, I check the archwiki libreoffice page before installing libreoffice to get all the features I want.
13) Get some default directory structure.
Many Linux distributions such as Ubuntu or Linux Mint set up your default user directories such as your downloads directory, music directory, documents directory, and so on. This also gives these directories special identifying icons. To set XDG user directories up, run this command:
# pacman -S xdg-user-dirs
$ xdg-user-dirs-update
Install codecs (mp3, ogg, etc):
# pacman -S gstreamer0.10-plugins
To access samba and windows shares trough nautilus, install this:
# pacman -S gvfs-smb gnome-vfs
General TIPS:
– You need at least 1 telepathy protocol for empathy to work:
pacman -S telepathy-butterfly telepathy-gabble
- telepathy-gabble: Jabber/XMPP
- telepathy-butterfly: MSN/windows live messenger
– Some nice cursors:
# pacman -S xcursor-vanilla-dmz xcursor-polar xcursor-pinux
– Don’t forget network manager for your networking needs:
# pacman -S networkmanager network-manager-applet
check the archwiki page for network manager for details on installing and configuring the application.
– If at any point, you want to edit which applications start at bootup type:
# gnome-session-properties
- fn + key combinations work as expected (ie. fn + f2 locks pc, fn + f4 suspends, etc)
- brightness buttons work correctly
- keyboard light works (fn + pgup key)
- volume keys work
- mute key works
- microphone mute key works
- Player control buttons work (fn + up, down, left, right)
- Multi-monitor setup works without additional tweaking
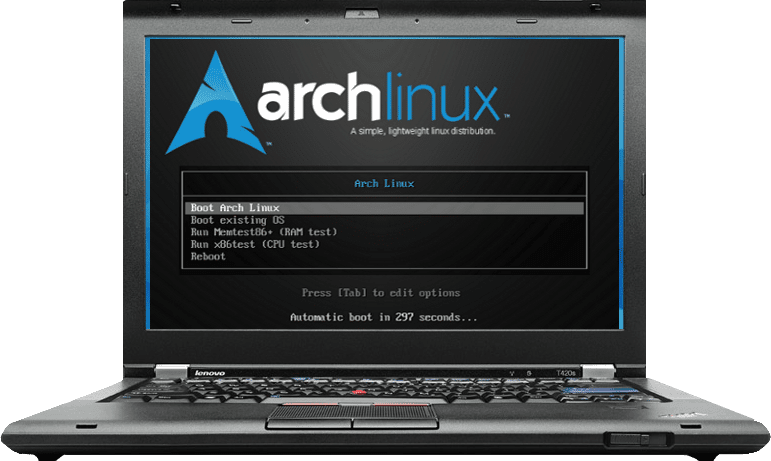
Here is a screenshot of the desktop


And 2 for the laptop itself with a neat Arch Skin so people ask "whats that logo?" :D


Impressive details! I have been previously looking for something such as this for a little bit now. Thank you!
Hey,
Thank you for your documentation. Did you have any major UEFI Boot issues?
I tried to install LMDE on the T420s, but it couldnt handle all the UEFI settings automatically.
Now I have Ubuntu 11.10 on my notebook. It configurated everything flawlessly and it was the first distribution, which worked “out of the box” with UEFI.
Do you have any tips for me? Iam really not happy with the perfomance of the Ubuntu installation and I really would like to switch to a rolling distribution.
I tried more than 10 times to install LMDE and Debian on the machine, but I never suceeded even to boot the operating system after the Installation. Even in “legacy mode” and so on.
The only thing that comes to mind from the failed installations is that your probably formatted your hard drive partitions but didn’t change the partition table to GPT (if you had windows on the disk at any time,chances are you have an MBR/msdos partition table).
From what I have read about it, UEFI + GPT partitions shouldn’t be a problem, I totally forgot to install the UEFI grub and GPT partition into this installation, so at the moment I am on normal boot (Grub Legacy) + msdos partitions. I am thinking if I should make the change or not but haven’t done it. Here you can find awesome information on UEFI
I have never used the Debian Testing repo (the one that fuels Linux Mint Debian Edition), but if you are going to switch to a rolling release distro I STRONGLY suggest Arch Linux because you build your system from the bottom up (instead of getting a default installation and uninstall what you don’t want), so you build your system to fit your needs, and thats pretty awesome! community is very friendly and they know A LOT. Also you wont depend on a “testing” repo as your updating base.
The only thing you will need is the Beginners Guide and some spare time to configure it, but after that, you will have a system that fits your need and its very, very fast.
I will make another post regarding the UEFI + GPT switch when I have the time to do it 😀
Hope it helped!
thank you. I will look over it. Somebody suggested to install archboot, which supports UEFI.
Heard about that?
Haven’t heard about it, but you can do it with normal Arch installation cd, just skip the last step (install bootloader) then swiitch to another terminal, (ctrl+alt+f1, or f2, or f3, or..you get the point 😀 ) and install grub2-uefi, you can start here
Note sure about your machines, but I had some issues with my X220 and UEFI:
http://blog.jamiek.it/2011/10/problems-with-thinkpad-x220-and-gpt.html
btw, it’s a good idea to always use GPT with SSDs.
Regarding the wireless card, RealTek drivers are also included in the Kernel, so neither should be a problem.
btw, if your Windows 7 installation was taking 32 seconds to boot then there was something wrong. Even without Lenovo’s RapidBoot it should have been quicker than that, especially on an SSD.
Jamie,
Well if it took that long to boot all the time and without me doing anything to the OS (It started happening since I took it out from the box and turned it on) I will consider that normal Windows 7 behaviour.
I just read your post on your blog and have a question, does the X220 has UEFI bios?
On the Arch UEFI link I provided to Ethan above it states that you need to make a separate small (200mb) partition in order to accomodate some UEFI stuff there.
About the signing part I really dont know, I always have had the tought that some laptop manufacturers hate Linux because they dont get it you want to customize the system so every time they make it harder for you to do it so they can have less support requests.
Yes the X220 does boot UEFI media, from the UEFI boot partition. I link on my blog to instructions to make a very useful UEFI/BIOS USB boot disk:
https://gitorious.org/tianocore_uefi_duet_builds/pages/Linux_Windows_BIOS_UEFI_boot_USB
I have installed Arch on a Thinkpad with GPT partitioned SSD and UEFI boot. This cannot be achieved with the default Arch installer, as it will not be able to modprobe efivars and therefore add itself to the UEFI index with efibootmgr. To make the switch from BIOS to UEFI with an existing install, you need access the EFI shell and not all systems provide that option (read: thinkpads). I have not investigated installing one manually.
It is much easier to accomplish UEFI installation by using Archboot iso and making sure the installation media itself is actually being booted with UEFI. This make everything simple and straightforward. A lot more info can be found the Arch forums.
That’s a nice skin.. What was the image you used for it? Did it have that blue background already?
yes it did. Can’t remember the image name but it is inside the media pack I uploaded to a different post here: https://snott.net/linux/archlinux-media-pack/
Cheers.. I’m trying to find one that will look good on my dell, and cover the logo fully..
which model is it? maybe I can help by making some suggestions
It’s a studio 1747. I have since purchased a skin from fathead, and although it doesn’t go edge to edge it does still look nice and covers the logo nicely. Nice and tidy
Thank you, still very useful.